Getting Started
Creating a New Widget
You can scaffold a mobile widget in two ways:
| Approach | Command | Best for |
|---|---|---|
| Offline starter | pnpm exec nx generate @cdx-extensions/widget-template-mobile:widget | Blank React Native library with no catalog |
| Catalog templates | pnpm exec nx run generate-mobile-widget | DI-backed starters from the extension template catalog |
Both create a correctly structured React Native library wired for @cdx-extensions/di-sdk (PlatformSDK), built with tsup, and aligned with the CDX mobile patterns used in the reference implementations.
For catalog-driven generation (category picker, npm template overlays), see Extension Template Catalog. Quick reference:
pnpm exec nx run generate-mobile-widget                # interactive: widget only
pnpm exec nx run generate-mobile-extensions            # interactive: type → category → template → fiId → name
pnpm exec nx run generate-mobile-widget -- --template=investment-portfolio --fiId=0123 --name=acme-portfolio
Looking for a full-screen bottom-tab or More-menu experience instead? See Features — Getting Started.
The Offline Starter Template
Use the offline starter when you want a blank scaffold without the catalog. The package @cdx-extensions/widget-template-mobile exposes a widget generator for embedded home-screen components.
Prerequisites
Before you run the generator, complete the prerequisites and environment setup described in the CDX Extensibility Apps README. That reference repo uses pnpm (corepack enable, then pnpm run setup). Prefix Nx with pnpm exec. If corepack enable fails, see Troubleshooting. For when to use pnpm run vs pnpm exec, see pnpm run vs pnpm exec.
When to Use a Widget
| Generator | Use when | Example |
|---|---|---|
widget | You are building a component the host mobile banking app embeds in the existing home screen. | 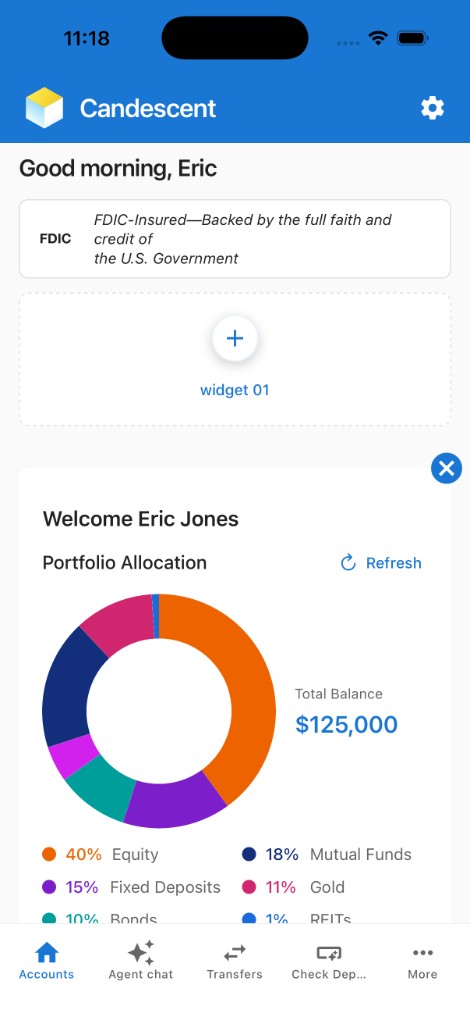 Sample Widget — embedded component on the home screen |
Command
pnpm exec nx generate @cdx-extensions/widget-template-mobile:widget --fiId=<fi-id> --name=<name>
| Option | Required | Description |
|---|---|---|
--fiId | Yes | Your FI Id (digits only; 4 or 5 digits, e.g. 0123 or 03100). Used as the package scope — the generated package name is @<fiId>-extensions/<name>. Leading zeros on 5-digit IDs are preserved. If Nx drops a leading zero in non-interactive mode, quote the value or pass --fiId=str:03100. |
--name | Yes | Name of the widget (e.g. account-summary). Used as the Nx project name and folder name |
Example
pnpm exec nx generate @cdx-extensions/widget-template-mobile:widget --fiId=0000 --name=my-widget
pnpm exec nx generate @cdx-extensions/widget-template-mobile:widget --fiId=str:03100 --name=my-widget
What Gets Created
Scaffolded under widgets/mobile/<name>/ by default:
widgets/mobile/my-widget/
├── src/
│   ├── my-widget.tsx              ← widget component — start here
│   ├── index.ts                   ← named + default exports
│   └── types/
│       └── branding.ts            ← MobileBrandingTheme types and resolveColors helper
├── package.json
├── project.json
├── tsconfig.json
└── README.md
The widget starter template is minimal. Add API calls, navigation, or any SDK capability as your project requires — see the investment-portfolio reference implementation for an example that uses getHttpClient().
After You Generate
The generator registers your project in the sandbox automatically. From the repository root:
pnpm run sync:mobile
pnpm exec nx start mobile-sandbox
Press i for the iOS Simulator, a for Android Emulator, or scan the QR code with Expo Go on a physical device. The sandbox provides the mock platform (user context, branding, HTTP client) so your widget can run without the production host app.
Red specifiers in the lockfile don't match then [sync-mobile-sandbox] during catalog generate is expected — wait for the green Nx success. Do not run pnpm run ci:mobile until that sync finishes. See Sandbox lockfile out of sync.
For how widgets appear inside the banking-style home layout (scroll, chrome, and tabs), see Mobile Playground for more.
What You Can Edit
| File / Folder | Can you edit? | Notes |
|---|---|---|
src/ | Yes, freely | All your UI and business logic goes here |
package.json | Partially | Change name, version, peerDependencies. Keep the build scripts and tsup config as-is |
project.json | Partially | Only change name, outputs, and cwd to match your project folder |
tsconfig*.json | No | Required TypeScript config |
Common Mistakes to Avoid
| Mistake | Why It Breaks |
|---|---|
Using fetch() or Axios directly instead of sdk.getHttpClient() | Bypasses platform auth and security in production |
Importing from @cdx-extensions/di-sdk-mobile in widget code | Only the host app initialises the platform — widgets import from @cdx-extensions/di-sdk only |
| Adding peer or runtime dependencies outside the versions listed in the CDX Extensibility Apps README | Version conflicts with the host mobile banking app at runtime |
Forgetting to export from src/index.ts | The sandbox (or host app) cannot import your component |
Changing the tsup build scripts in package.json | Breaks the CJS/ESM dual output required for Metro and production bundling |
Next Steps
Mobile platform guides:
- SDK Reference — SDK packages, methods, and usage
- Extension Template Catalog — Scaffold from DI template catalog
- Mobile Playground — Realistic home screen for previewing embedded widgets
- Platform Capabilities (Local) — How local development works with mock data
- Host App Integration — Repository structure and submission process
- Features — Getting Started — Full-screen mobile features